How to Set Up Webhooks in Wavity?
Wavity offers seamless integration with third-party software applications via webhooks. This capability allows Wavity to interact with external systems by sending and receiving real-time data and notifications. By leveraging webhooks, you can automate workflows, synchronize data, and enhance the functionality of both Wavity and other connected applications.
There are 2types of Webhooks in Wavity, they are:
1. Inbound Webhook – to create data in Wavity from other apps and services.
2. Outbound Webhook – to create data in other apps and services from Wavity.
Setting Up Inbound Webhook in Wavity:
To configure the Inbound Webhook in Wavity, simply follow these steps:
- Login to the Wavity admin account.
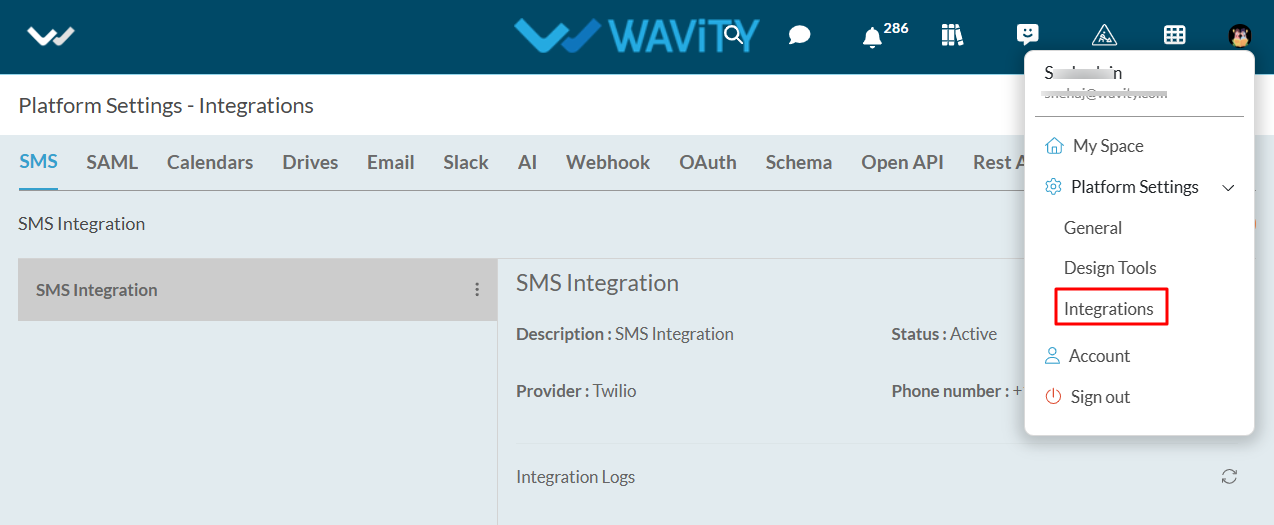
- Click on the Profile icon and select 'Integrations’.
- Click on the Webhook Tab and click on the “Create" button to create a inbound Webhook.

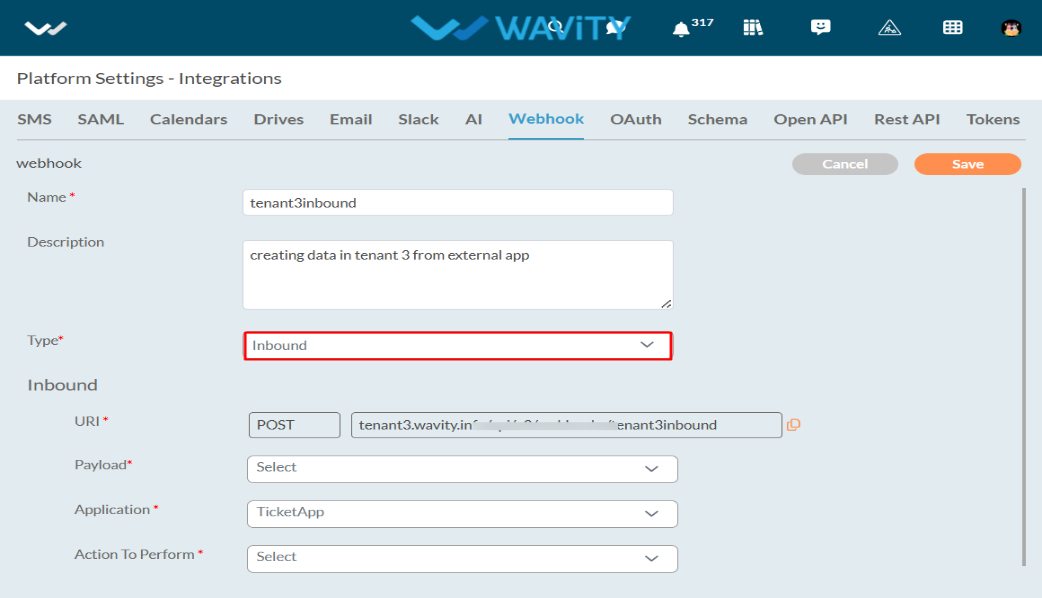
- Specify a name for the webhook in the Name field.
- Enter the description for the webhook in the Description field.
- Choose Inbound in the Type field.
- URI will be automatically generated under the Inbound section in URI field.
- Choose a created schema in the Payload field. (Creation of Schema Document)
- Choose the created ticketing application in Application field.
- Choose the active wBot which will create data in Wavity from another service.
- Click on the “Save” button.
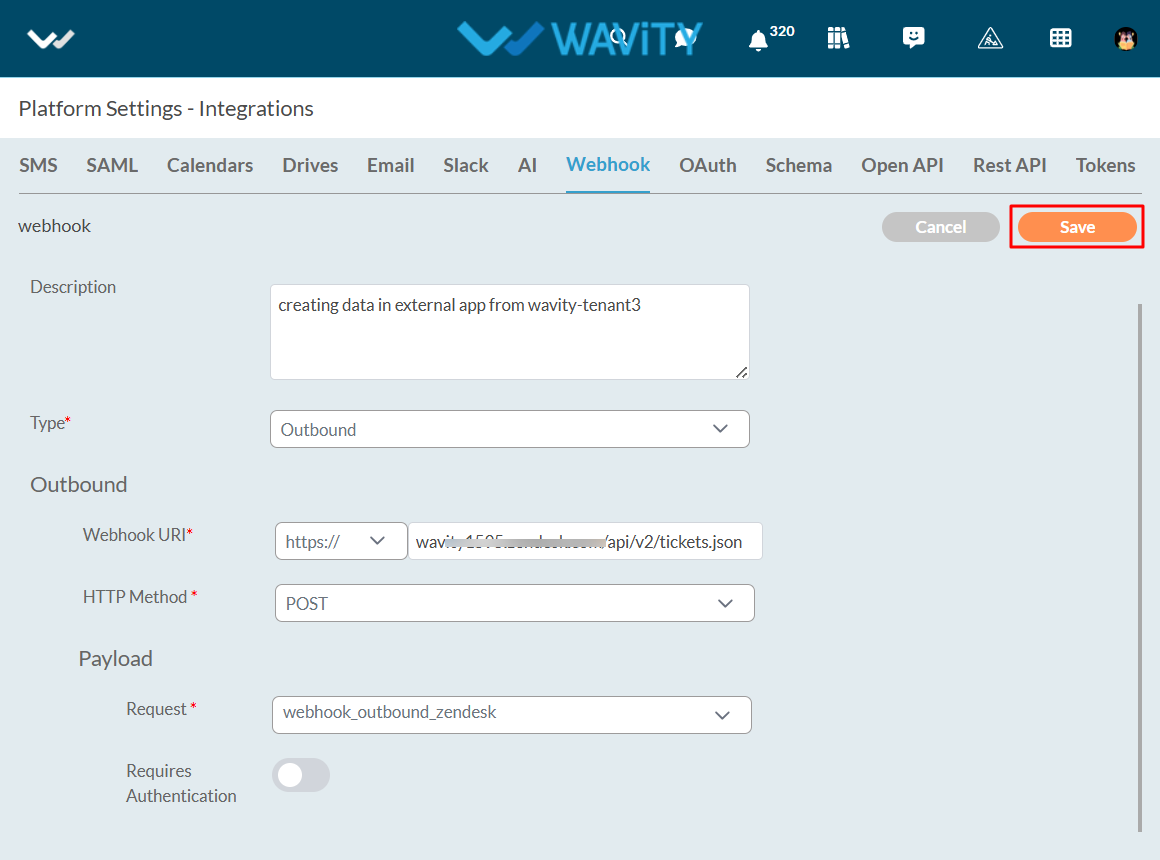
- That’s it! You have successfully added an inbound webhook to the Wavity account.
Setting Up Outbound Webhook in Wavity:
- Login to the Wavity admin account.
- Click on the Profile icon and select 'Integrations’.

- Click on the Webhook Tab and then click on the “Create" button to create a new outbound webhook.

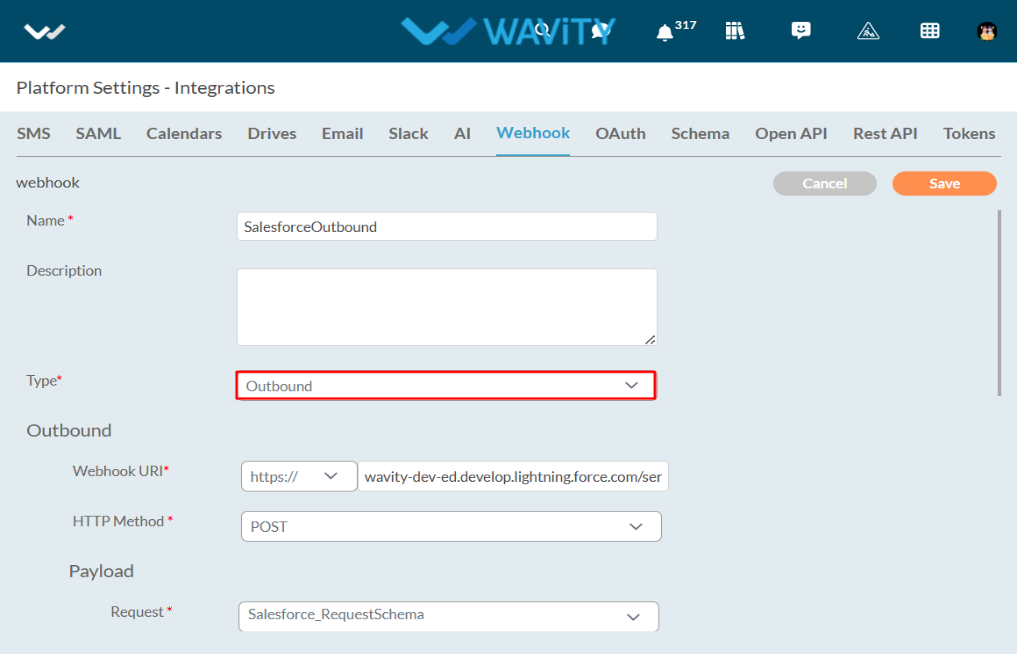
- Specify a name for the webhook in the Name field.
- Enter the description for the webhook in the Description field.
- Choose Outbound in the Type field.
- Enter the Webhook URI of the application or service to which Wavity is sending data in Webhook URI field.
- Select POST/PUT/PATCH in HTTP method field.
- Choose a created schema in the Payload field.
Authentication types provided in Webhooks:
- With Authentication
- HTTP authentication
- Basic (Authorization header - Outbound only)
- Bearer or token authentication (Authorization header with bearer token)
- OAuth2.0 authentication with the following Grant Types:
- Authorization Code
- Client Credentials
- Password Credentials
- HTTP authentication
- Without Authentication (Outbound only)
The following sections provide a comprehensive overview of the different types, each accompanied by a detailed explanation of the steps involved in their execution.
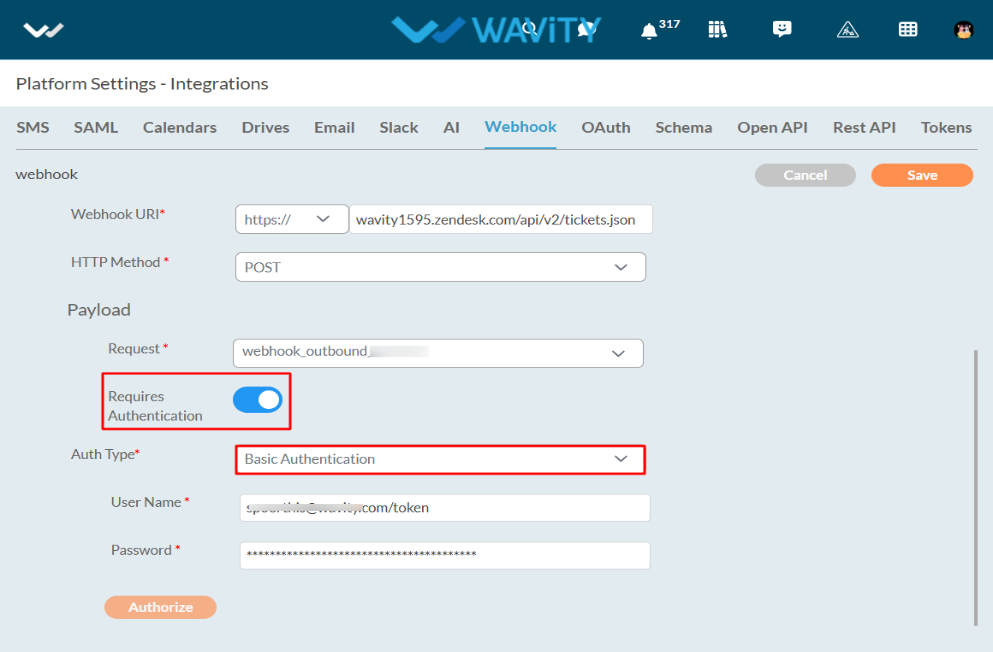
With Basic Authentication:
- Turn-on the Requires Authentication Toggle button.
- Choose Basic Authentication in Auth Type.
- Enter the username of the application or service to which Wavity is sending data.
- Enter the password of the application or service to which Wavity is sending data.
- Click on the Authorize button.
- Click on the Save button.
- That’s it! You have successfully added an outbound webhook with Basic Authentication to the Wavity account.
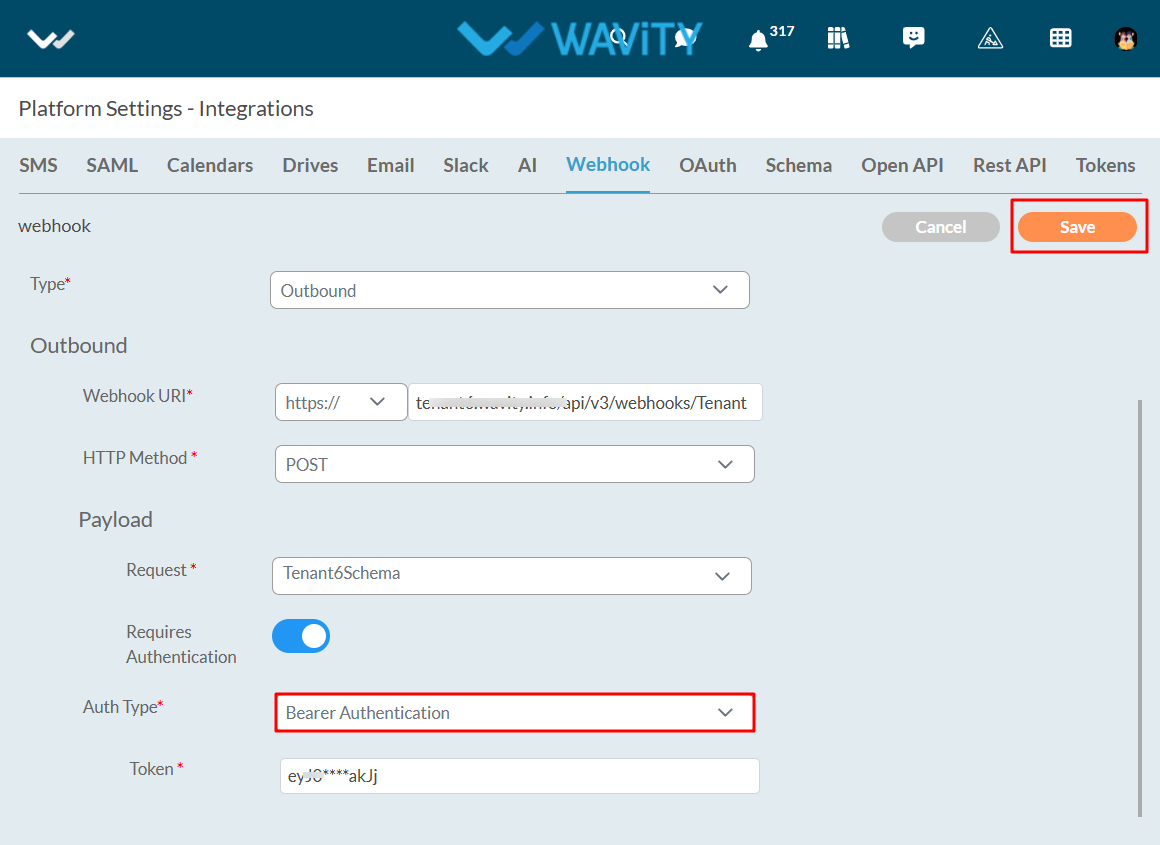
With Bearer Authentication:
- Turn on the Requires Authentication Toggle button.
- Choose Bearer Authentication in Auth Type.
- Enter the bearer token of the application or service to which Wavity is sending data.
- Click on the Save button.
- That’s it! You have successfully added an outbound webhook with Bearer Authentication to the Wavity account.
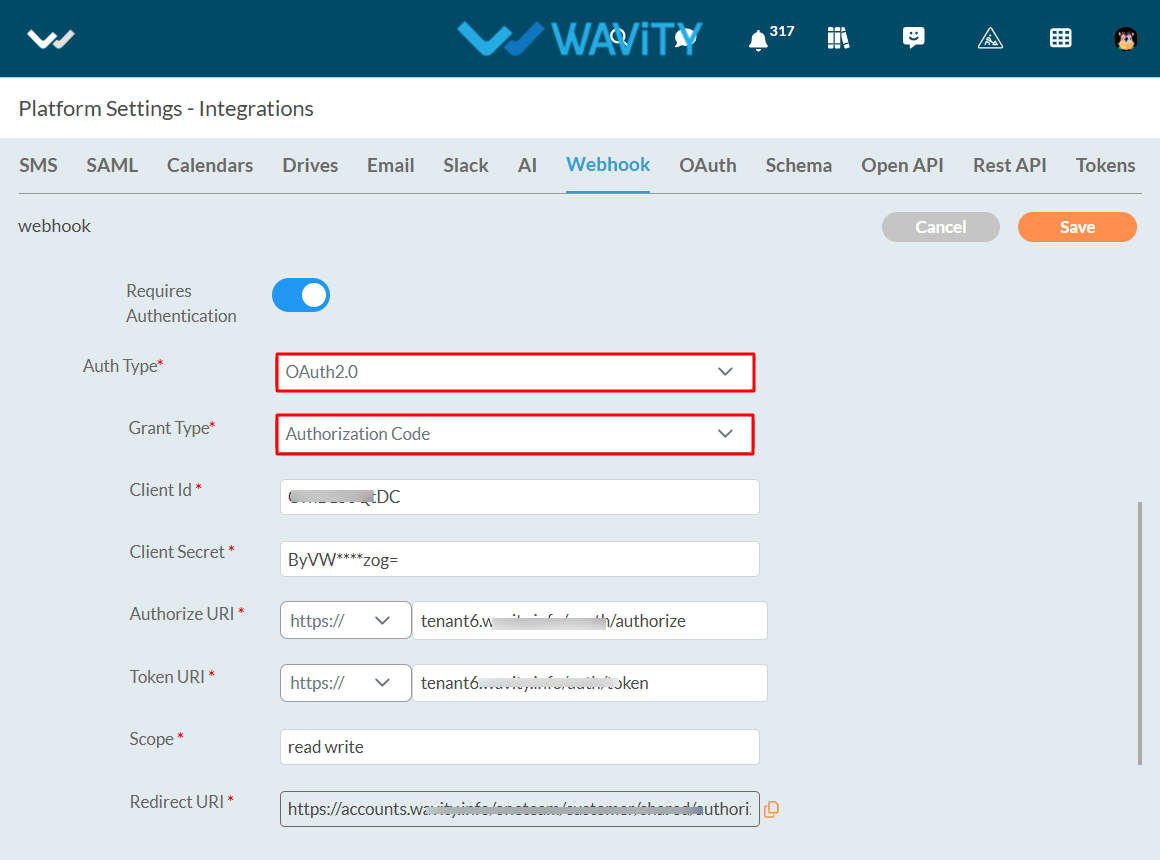
With OAuth2.0 and Grant Type – Authorization Code:
- Turn on the Requires Authentication Toggle button.
- Choose OAuth 2.0 in Auth Type.
- Choose Authorization Code in Grant Type.
- Enter the Client Id of the application or service to which Wavity is sending data.
- Enter the client code of the application or service to which Wavity will be transferring data.
- Enter the Authorize URI of the application or service to which Wavity is sending data.
- Enter the Token URI of the application or service to which Wavity is sending data in Token URI field.
- Enter scope of the application or service to which Wavity is sending data in Scope field.
- Redirect URI will be automatically generated in the Redirect URI field.
- Enter the refresh token URI of the application or service to which Wavity is sending data.
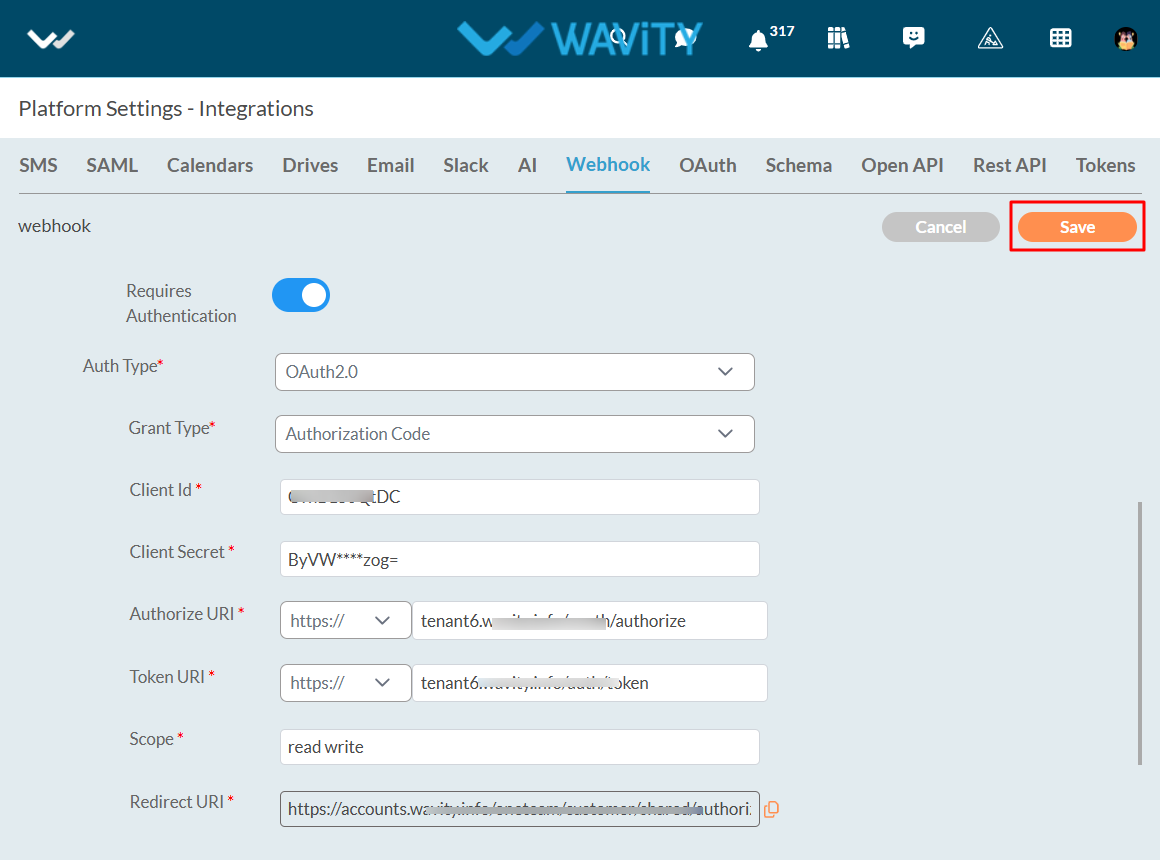
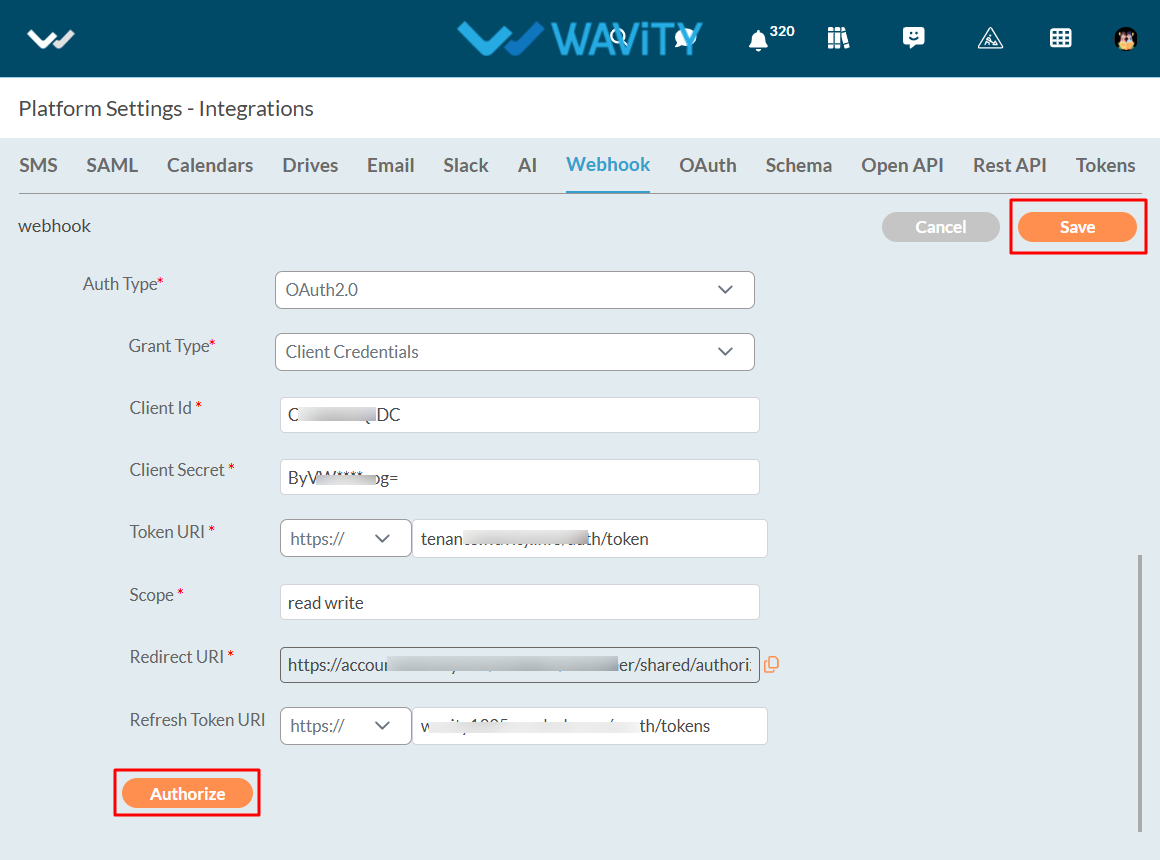
- Click on the Authorize button.
- Click on the save button.
- That’s it! You have successfully added an outbound webhook with OAuth2.0and Grant Type - Authorization Code to the Wavity account.
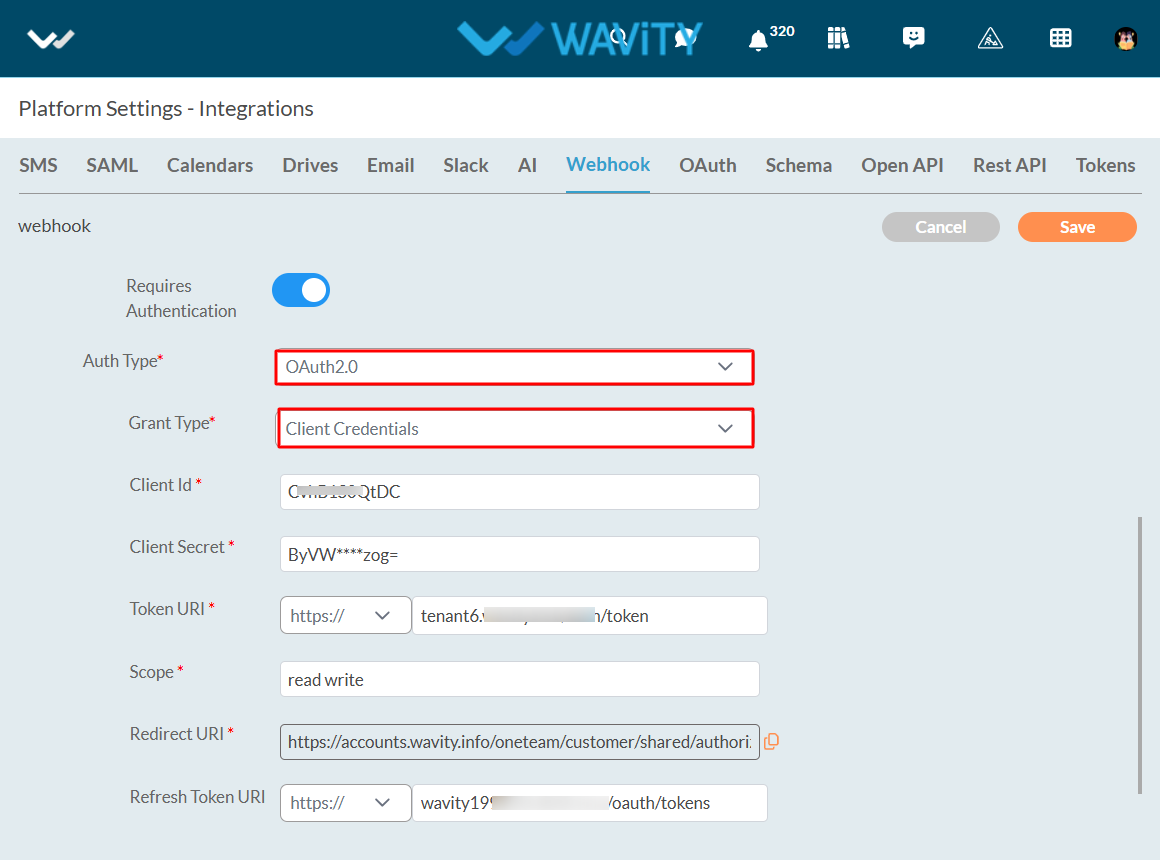
With OAuth2.0 and Grant Type – Client Credentials:
- Turn on the Requires Authentication Toggle button.
- Choose OAuth 2.0 in Auth Type.
- Choose Client Credentials in Grant Type.
- Enter the Client Id of the application or service to which Wavity is sending data.
- Enter the client code of the application or service to which Wavity is transferring data.
- Enter the Token URI of the application or service to which Wavity is sending data.
- Enter scope of the application or service to which Wavity is sending data in Scope field.
- Redirect URI will be automatically generated in the Redirect URI field.
- Enter the refresh token URI of the application or service to which Wavity is sending data in Refresh Token URI field.
- Click on the Authorize button.
- Click on the save button.
- That’s it! You have successfully added an outbound webhook with OAuth2.0and Grant Type – Client Credentials to the Wavity account.
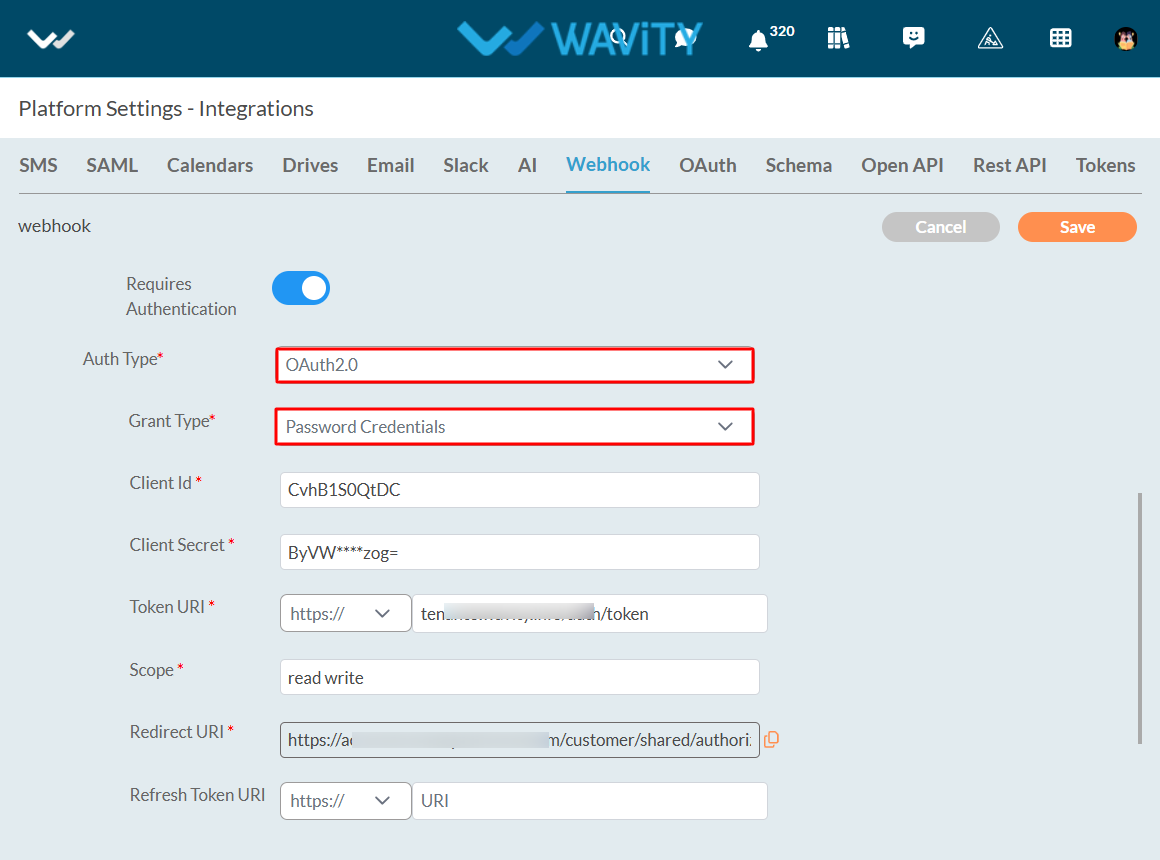
With OAuth2.0 and Grant Type – Password Credentials:
- Turn on the Requires Authentication Toggle button.
- Choose OAuth 2.0 in Auth Type.
- Choose Password Credentials in Grant Type.
- Enter the Client Id of the application or service to which Wavity is sending data.
- Enter the client code of the application or service to which Wavity is sending data.
- Enter the Token URI of the application or service to which Wavity is transferring data.
- Enter scope of the application or service to which Wavity is sending data in Scope field.
- Redirect URI will be automatically generated in the Redirect URI field.
- Enter the refresh token URI of the application or service to which Wavity is sending data in Refresh Token URI field.
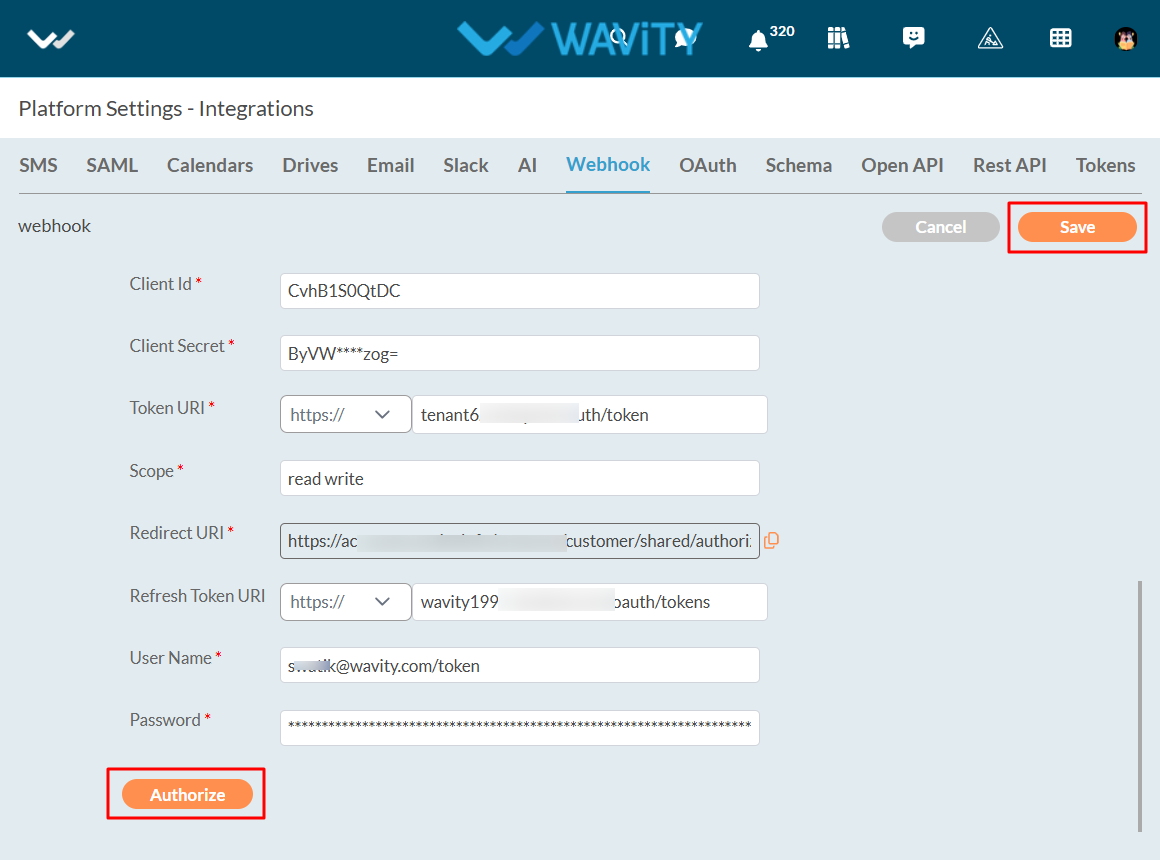
- Enter the username of the application or service to which Wavity is sending data.
- Enter the password of the application or service to which Wavity is sending data.
- Click on the Authorize button.
- Click on the save button.
- That’s it! You have successfully added an outbound webhook with OAuth2.0and Grant Type – Password Credentials to the Wavity account.
Without Authentication:
- Turn off the Requires Authentication Toggle button.
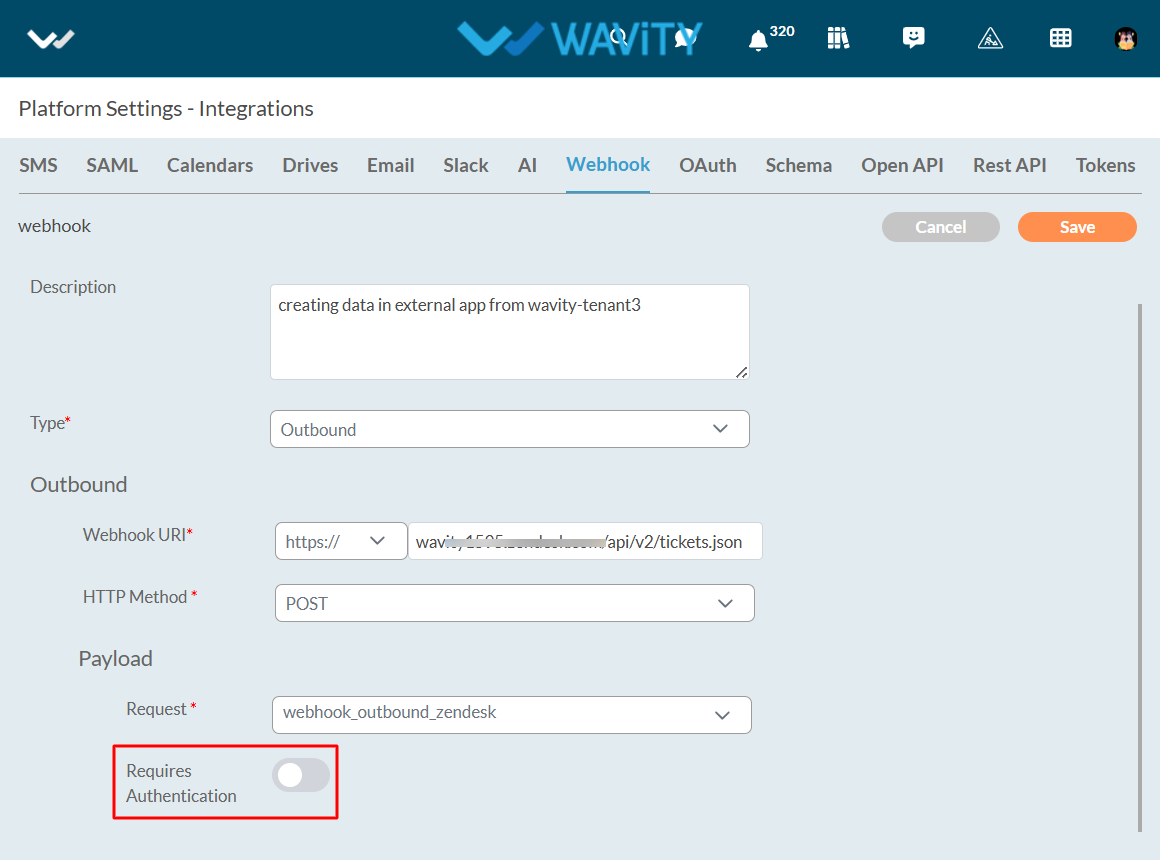
- Click on the save button.
- That’s it! You have successfully added an outbound webhook without Authentication to the Wavity account.
